I installed successful Systemcenter Operations Manager 2012 Webconsole on a Windows 2012 SP1 Server with IIS 8. The installation was done with https and CU3 was applied after the installation.
Problem:
The Webgui ended in an “An unexpected error has occurred.” All tricks on the web did not help.
Solution:
The IIS log showed the last command was /OperationsManager/Services/Logon.svc. The svc is a WCF Web Service and this was the Problem . An installation of IIS 8 with .net according to setup guides did not install the features for WFC Web Service . Bad that all requirement checks during installation showed Green . After activating the features and restarting IIS the GUI finally appeared.
What to do:
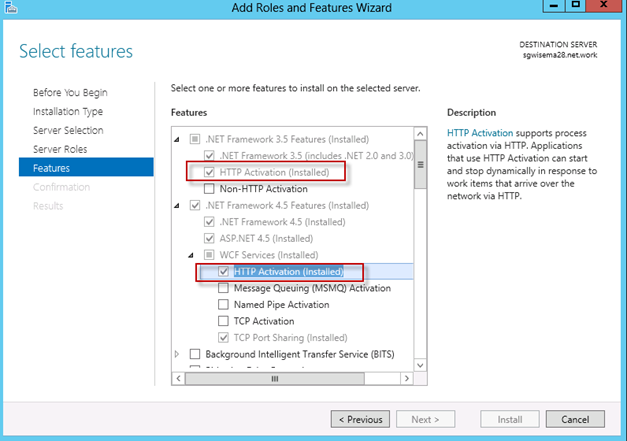
Open Features installation
Select .Net Framework 3.5 ….
Mark HTTP Activation for Installation
Open .Net Framework 4.5 …
Open WFC Services
Mark HTTP Activation for Installation
Install it and restart IIS 8.
Posted inInformation Technology|TaggedIIS, SCOM|Comments Off on SCOM 2012 Webconsole on IIS 8 shows unexpected error
There is an SQL 2012 server and a view remote Server requiting Connection to to this SQL database Server.
Problem / Error:
No connection could be made because the target machine actively refused it.
SQL Server with alias shows an error when connecting from remote server via alias name.
Local connection ist working.
Solution:
The connection is working when the sql instance is added to the alias name(aliasname\instance). Adding the instance name to the alias in sql server configuration did not help .
Posted inFix IT|TaggedSQL|Comments Off on SQL alias connection refused from remote system
To detect orphaned users, execute the following Transact-SQL statements per database:
USE <database_name>;GO;sp_change_users_login @Action=’Report’;GO;
Possible Response
The output lists the users and corresponding security identifiers (SID) in the current database that are not linked to any SQL Server login. For more information, see sp_change_users_login (Transact-SQL).
To repare the broken relation between sql user and db user you have to create the sql user . After this use the following procedure to recreate the relationship.
USE <database_name>;
GO
sp_change_users_login @Action='update_one', @UserNamePattern='<database_user>', @LoginName='<login_name>';
GO
Open SQL Management Studio. Disconnect all server connections. Leave GUI open as we need the Query Analizer
stop all SQL services
open services by running service.msc
open properties of the sql instance and copy the sql executing path C:\Program Files\Microsoft SQL Server\MSSQL11.SQL1\MSSQL\Binn\sqlservr.exe -c -f -sSQL1
run this command line with additional option –c –f now is a sql instance in single user mode running Leave the process running, we come back later on
change to SQL Management Studio and run a new query as sa user execute the following sql code after adjusting it to your needs
Use Master
go

ALTER DATABASE tempdb
MODIFY FILE (NAME = 'tempdev', NEWNAME = 'tempdev1', FILENAME = N'T:\SQL1\tempDB\tempdev1.ndf')
ALTER DATABASE tempdb
MODIFY FILE (NAME = 'tempdev1', SIZE = 5120000KB , FILEGROWTH = 51200KB )
go

ALTER DATABASE tempdb
MODIFY FILE (NAME = 'templog', SIZE = 2048KB , FILEGROWTH = 1024KB);
GO

ALTER DATABASE [tempdb] ADD FILE ( NAME = N'tempdev2', FILENAME = N'T:\SQL1\tempDB\tempdev2.ndf' , SIZE = 5120000KB , FILEGROWTH = 51200KB )
GO

ALTER DATABASE [tempdb] ADD FILE ( NAME = N'tempdev3', FILENAME = N'T:\SQL1\tempDB\tempdev3.ndf' , SIZE = 5120000KB , FILEGROWTH = 51200KB )
GO

ALTER DATABASE [tempdb] ADD FILE ( NAME = N'tempdev4', FILENAME = N'T:\SQL1\tempDB\tempdev4.ndf' , SIZE = 5120000KB , FILEGROWTH = 51200KB )
GO

Use Master
go
ALTER DATABASE tempdb
MODIFY FILE (NAME = 'templog', FILENAME = N'T:\SQL1\tempDBlog\templog.ldf')
GO
Use Master
go
ALTER DATABASE tempdb
MODIFY FILE (NAME = 'tempdev', NEWNAME = 'tempdev1', FILENAME = N'T:\SQL1\tempDB\tempdev1.ndf')
ALTER DATABASE tempdb
MODIFY FILE (NAME = 'tempdev1', SIZE = 5120000KB , FILEGROWTH = 51200KB )
go
ALTER DATABASE tempdb
MODIFY FILE (NAME = 'templog', SIZE = 2048KB , FILEGROWTH = 1024KB);
GO
ALTER DATABASE [tempdb] ADD FILE ( NAME = N'tempdev2', FILENAME = N'T:\SQL1\tempDB\tempdev2.ndf' , SIZE = 5120000KB , FILEGROWTH = 51200KB )
GO
ALTER DATABASE [tempdb] ADD FILE ( NAME = N'tempdev3', FILENAME = N'T:\SQL1\tempDB\tempdev3.ndf' , SIZE = 5120000KB , FILEGROWTH = 51200KB )
GO
ALTER DATABASE [tempdb] ADD FILE ( NAME = N'tempdev4', FILENAME = N'T:\SQL1\tempDB\tempdev4.ndf' , SIZE = 5120000KB , FILEGROWTH = 51200KB )
GO
Use Master
go
ALTER DATABASE tempdb
MODIFY FILE (NAME = 'templog', FILENAME = N'T:\SQL1\tempDBlog\templog.ldf')
GO
close the query window Then got to the command line and press ctr+c to terminate the single user session now remove all temp db files . they will be created on next sql service start. next start all sql services and check the new settings
Boot your computer using your installation CD and change to a command line prompt. Check where your drives are now. For this example lets say boot disk C: is on D: and your data disk D: is showing up on E:
Create a folder users on your target drive using md e:\users
move all content of D:\users to e:\users , your new home folder
Now link your target to the original user home – mklink e:\users d:\users /j
After rebooting your system your OS thinks c:\users ist still the users home but the physical location is now the new drive.
Posted inUncategorized|Taggedtool, Window 7|Comments Off on move user homes to an other drive using a link